Presenting My Newest Nemesis: The Gold Smoke Knight (painted 2/7/19)
"A flash of light splits the darkness, illuminating the approaching shape of an enormous knight holding a massive ornate maul. Great plumes of inky smoke pour from every gap of the knight's golden armor. The Gold Smoke Knight speaks in an unknown language, a hollow metallic voice echoing from its armor. It stands at ease, awaiting its challengers."
- Excerpt from Kingdom Death: Monster, The Gold Smoke Knight Showdown

When I first got the Kingdom Death: Monster Core Game, one of the miniatures that I found most intriguing from a hobbyist perspective was the Gold Smoke Knight. The Gold Smoke Knight was one of the first miniatures that I put together, and back then, that's as far as I wanted to go. Given how a lot of other miniature painters represented the Gold Smoke Knight, I didn't want to paint this bad boy till I was able to give it the justice it deserved. Fast forward seven months later and I decided to give GSK a try. Not because I'm good enough to tackle the miniature, but because I just wanted to.

For the most part, my strategy for the base was to create a dark stone base coat with subsequent lighter coats. Pretty typical of me; however, I did want to try something different with the flames and smoke. before I started painting I looked at a lot of variations of the GSK miniature on the KDM Collector site. There's some excellent work on that site including some very detailed feathering work for the flames. I did note that out of all the examples there, no one did any green variant flames, so I decided I wanted to try out that color.
After the necessary priming, I started with a dark grey base on skull faces. After a few coats, I put down some dark tone wash to really accentuate the shadows. I went very liberal with the wash coats to have the crevices and the eye sockets really pop out.

After going a bit crazy with the wash, I began to put down the dry-brush coats. As usual, I started with a slightly lighter hue of the base coat, and then reapplied further coats of even lighter tones still I got the end result pictured. I tried a slightly different method with the dry-brushing for the base; I used a different dry-brush than I typically use. Also, this time when dry-brushed a surface, I brushed from random directions. I had noted in the past that a lot of my finished dry-brush areas had obvious painting streaks, which detracted from the natural look of the highlights. This time, I attempted to paint from different directions, thereby effectively removing any obvious paint lines. While I'm not one to boast, I think that the end result is the best dry-brushing job I've done so far.
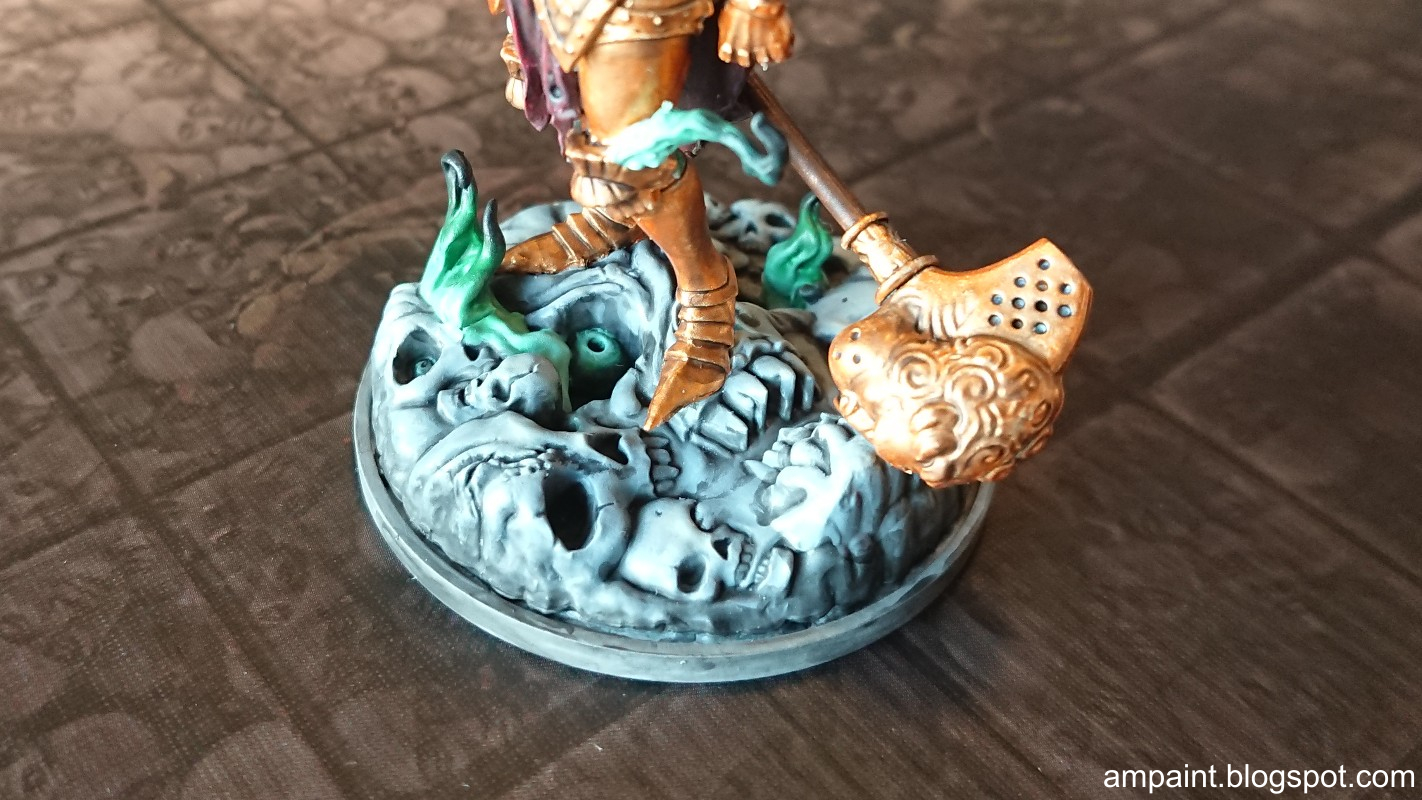
After finishing the grey bits, it was time to do the flames. Fun. Like other GSK painters, the feathering technique has been utilized to give a transitioning tone in the flame. I've attempted the feathering technique before on other miniatures (The Lion God, The Sun Stalker, and The Lion Knight to name a few) but my experiences were minimal. Still, nothing ventured...

I predicted that the GSK would be the easier part to paint of the two components. The main reason is because the Gold Smoke Knight is just so damned big! Even though he stands on a 50mm base, this miniature is larger than typical, and a larger canvas typically means less really small details that need to be painted, at least in my experiences. Yay! As I began painting, I quickly learned that I was right, for the exception of the flame and smoke components.

Once I got the base down, I actually hit a bit of a wall. before even starting the miniature, I had a good understanding of the entire palette that I intended to use. I knew what color I'd use for the base

So I put down a few layers of the darker grey till I got a consistent tone. Afterwards, I went ahead and used my trusty dark tone wash. Side note: I use the dark tone was a lot! It was when I started working on the GSK that I realized that I probably even overuse the dark tone wash; I've already had to buy another bottle from one of my local hobby shops. Anyway, I put down a splash of the wash, making sure to go a bit heavier on the bits that warranted more shadowing. After the wash set, I went ahead and took the original grey base I used and created a lighter tone with the help of off-white paint. I grabbed the same brush I used for the dry-brushing on the base and applied a light coating on the fur cape. I did this a few times till I saw a consistent lighter tone develop. I then added more off-white and applied another dry-brush coat. Of course, each additional time I applied coats, I did so more lightly than previous. The only exception are the areas that would experience light - these areas got a heftier brushing of the lighter tones. Although the end result wasn't amazing, it was a solid job and like I hoped, it contrasted very well with the gold armor.
After the fur cape was done, I actually decided to go back and apply the details to the Gold

1. I kind of see the Gold Smoke Knight as more of a corporeal entity; it has no real physical presence other than the armor. It's all just smoke and mirrors inside, and as such I wanted to give a sense of the entity inside glowing enough to illuminate the armor.
2. I thought the effect sounded cool in my head and even if I fucked it up royally, it'd be a good bit of practice.

So after I got the necessary detailing done on the armor, I worked on any other bits I could find: the belt, the cloth dangling between the crotch (is this part of a tabard or a loin cloth?) the maul - pretty much every bit I could find till there was nothing left other than... duh, duh, duhhhhhhhh, the flames! Of course, there's a good reason why I was hesitant to work on this bit: it was the most challenging part and it required expert feathering in a small space. Still, I had to try.

So my strategy for the flames and the smoke on the GSK was the same strategy that I implemented with the flames on the base. The only difference was that I was trying to go more detailed with the flames on the miniature itself, especially with regards to the flames around the head. By more detailed, I basically mean that I created seven different shades that needed to be expertly applied. I won't waste your time repeating the step-by-step process (I already went over it when I was talking about painting the base) so I'll skip that bit. What I will say is that, as expected, this was the most challenging bit of the entire miniature. It was also the most rewarding. Successfully painting the flames and the smoke was not unlike taking out a really difficult boss in any Dark Souls game: it's always a major pain in the ass - so much so that you want to kill something in real life afterwards (maybe that pain-in-the ass cat that keeps mewling for food all the damned time!). But when you finally kill that son-of-a-bitch (the boss, not the cat) you feel this euphoria of satisfaction sweep over you. Finishing the flames were kinda like that.
Another side note: while I was working on the flames it was over the course of several mornings (I usually paint in the mornings before work). Strangely, each time I started painting, I kept finding areas on the flames

So with the completion of the flames and the smoke, the GSK was more or less complete. Given the attention to detail I gave the miniature, I went over it a few times to make sure that I was satisfied with what was done, and that was that. Oh, one other thing to point out when using the very difficult and time consuming feathering technique: you don't really need to add shadowing or highlights to the process. If you're doing it really well the shadowing and highlighting occur organically.
So I know that this miniature took me maybe 5 days to finish (again, painting usually just in the mornings) but it was a really fun time. A bit stressful worrying about executing the flames well, but it was well worth it.
All in all, this was another very fun experience. I came into this one with the expectation that I wouldn't do as well as I did. The experience was invaluable - especially with the opportunity to do some really detailed feather work. And while the palette isn't completely original, I'm glad that my choice of color scheme worked well. I've said it before, I'm sure I'll say it again, but it's still worth pointing out: this is arguably my best work yet. I love being able to say this because I find

As always, I hope that this showcase is enjoyed by all whom read it. Thanks so much for reading and please feel free share any comments or critiques. If you find my blog enjoyable, be sure to subscribe to get notifications on future posts. And to my devoted legions of fans: I do apologize for taking longer than normal to get posts out. Time is not on my side so far this year.
Comments
Post a Comment